This has popped up in several pictures I've posted.


This is the dungeon-in-a-cigar-box that I built. Absolutely nobody asked about this, but I'm going to write about it anyway.
Inspiration for this came from this CRIT KIT Kickstarter that I missed out on:
Stumbled upon that a couple months back and thought it looked cool. Portable box that functions as a dice tray, dice & mini storage, and modular dungeon. Thought it would be a fun project to try building myself.
Additionally, you already know I love some Dragon Warrior.

Thought I'd make my dungeon floor and walls resemble that.
Additionally, you already know I love some Dragon Warrior.
Thought I'd make my dungeon floor and walls resemble that.
Bill of materials
I picked up most of this stuff at Michaels. Any arts & crafts store likely has comparable items.- Wooden cigar box: http://www.michaels.com/artminds-unfinished-wood-box/10357774.html
- Peel & stick red felt: http://www.michaels.com/creatology-peel-and-stick-felt/M10572180.html
- A couple sheets of balsa wood. I think mine were 3/16" x 3" x 36" and 1/8" x 3" x 36".
- Sheet of 1" thick extruded insulation foam. Basically this (although I found a smaller sheet in-store): https://www.homedepot.com/p/Owens-Corning-FOAMULAR-150-1-in-x-4-ft-x-8-ft-R-5-Scored-Square-Edge-Rigid-Foam-Board-Insulation-Sheathing-20WE/207179253
Also going to need the following tools and items:
- Hot glue gun and glue
- White PVA glue (Elmer's, etc.)
- Acrylic craft paints: black, white, grey
- Various brushes for the craft paints
- Miniature terrain flocking: http://a.co/5UpCbHH
- Mechanical pencil
- Utility knife
- Exacto knife
- Scissors
- Cutting board
- Metal ruler
- Aluminum foil
- A whole bunch of sewing pushpins
- A couple large safety pins
- Shellac: http://a.co/39kwPka
- Wide brush for the shellac (those cheap, foam ones work fine)
- Medium and fine grit sandpapers
- A willingness to accept that you're going to make mistakes, but you can totally do this.
The build
Not going to provide too many exact measurements here. I don't remember a lot of mine, your cigar box might be a different size, etc.
The box in the Kickstarter uses 1" squares (so it can fit 1" based miniatures). So my initial plan was to do likewise.
I had also recently watched Runehammer's and Black Magic Craft's YouTube videos on "dungeon stackers" -- a way of making modular pieces that can be used as walls, stairs, buildings, etc. Thought I would try that as well.
So I cut out a whole bunch of 1" x 1" x 1" cubes (and half-height pieces as well) from the insulation foam.

At which point I realized that, due to the size of my cigar box, this would only give me a 7x7 area. Way too small to be useful for much. So, build it anyway just for the fun of it? Buy a larger box? Give up?
I make all of my miniatures myself. I entirely control what size I make those at. So let's make the miniatures and therefore the squares smaller. If I make my miniatures 15mm scale, US pennies are commonly used bases. They are 3/4" in diameter. Which happens to work out to at 10x10 space in my cigar box (with a bit of a border around). Perfect.
Trimmed all of my 1" cubes into 3/4" cubes.

I take each 3/4" cube (and half-height cube) and roughly cut along each edge with an exacto knife. I also cut random lines, crevices, etc. into the blocks with a knife. Method was basically: roll the cube like a die, cut a line in the edge that's facing me.

For the dungeon floor, I cut a bunch of 1/4" x 3/4" x 7.5" strips from the insulation foam. For all of the brick pattern lines, roughly eyeballed those with an exacto knife. Started with the long center line, another line along each side of that, and then all of the small, alternating, perpendicular brick lines. After doing this with the knife, ran down all of the previously cut lines with the tip of a mechanical pencil to widen them out. I encouraged small pieces of foam to fall off, as it would contribute to the random, worn look of the brick.

10 of those strips will make the 10x10 playing space. Those 10 strips get hot-glued onto a piece of cardboard that will later be painted and glued onto the cigar box lid.
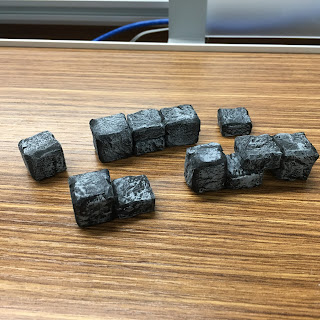
Don't have a pre-painting photo, but for the walls, a 3/4" cube gets glued to a half-height piece to form the "dungeon stacker" shape.
Ball up a piece of aluminum foil and run it over every side of every block and dungeon floor sheet. It will help create a rough, rocky pattern in the foam.
Painting is a two-step process: base layer and dry brushing.
For the base layer, I mix 1 part PVA glue with 1 part black acrylic paint. The PVA glue will dry hard and make the foam a little more solid. Give full coverage with the base layer all-over.

I leave everything to dry overnight.
The next day, it's time for the dry brushing. Won't go into too much detail on dry-brushing here, but, basically, load a little bit of gray paint on the brush, wipe off almost all of it on a piece of paper, then "dust" the brush back and forth over the surface you're painting. The little bit off remaining paint (and there's always some remaining paint) will catch the highest surfaces on the object you're painting. So you'll end up with a surface that has crevices painted in black, and higher surfaces painted in lighter gray. Looks 3D and great.

After another bit of drying, we're done with painting. I wanted a dungeon floor that was a combination dungeon & garden, so I randomly paint some PVA glue onto the surface and sprinkle green flock on top.

Take the piece of cardboard the dungeon floor strips are attached to and trim it to the size of the inside of the cigar box lid. Use a bunch of PVA glue and attach it to the inside of the lid.

Since the bottom part of the box was going to be used for dice rolling, I wanted the walls to be a little taller. Do some math: inside height of lid + inside height of box bottom - height of dungeon floor strips - little bit of wiggle room = how high to make the walls. Cut four walls out of the 3/16" balsa wood, PVA glue them to the inside of the box and clamp them until they dry. (Or do what I did and cut a piece of foam to press the walls into the box.)

After it dries, you'll want to take some sandpaper to the edges to round them out so they: a) Look nice, and b) the box can close smoothly.

For the bottom dice tray, measure the inside dimensions of your box, cut the felt to that size, peel & stick it to the box. Easy.

If you like, do what I did and remove the pins from the hinges. Replace them with the large safety pins and any additional decoration you'd like. The idea is, you can separate the top and bottom of the box whenever you like.

Another optional thing: if you want inside divider walls, take the 1/8" sheet of balsa wood, cut out three pieces of the appropriate height and length, cut out slots so they fit together, then place them in the box.


And you're done!
The box in the Kickstarter uses 1" squares (so it can fit 1" based miniatures). So my initial plan was to do likewise.
I had also recently watched Runehammer's and Black Magic Craft's YouTube videos on "dungeon stackers" -- a way of making modular pieces that can be used as walls, stairs, buildings, etc. Thought I would try that as well.
So I cut out a whole bunch of 1" x 1" x 1" cubes (and half-height pieces as well) from the insulation foam.

At which point I realized that, due to the size of my cigar box, this would only give me a 7x7 area. Way too small to be useful for much. So, build it anyway just for the fun of it? Buy a larger box? Give up?
I make all of my miniatures myself. I entirely control what size I make those at. So let's make the miniatures and therefore the squares smaller. If I make my miniatures 15mm scale, US pennies are commonly used bases. They are 3/4" in diameter. Which happens to work out to at 10x10 space in my cigar box (with a bit of a border around). Perfect.
Trimmed all of my 1" cubes into 3/4" cubes.

I take each 3/4" cube (and half-height cube) and roughly cut along each edge with an exacto knife. I also cut random lines, crevices, etc. into the blocks with a knife. Method was basically: roll the cube like a die, cut a line in the edge that's facing me.

For the dungeon floor, I cut a bunch of 1/4" x 3/4" x 7.5" strips from the insulation foam. For all of the brick pattern lines, roughly eyeballed those with an exacto knife. Started with the long center line, another line along each side of that, and then all of the small, alternating, perpendicular brick lines. After doing this with the knife, ran down all of the previously cut lines with the tip of a mechanical pencil to widen them out. I encouraged small pieces of foam to fall off, as it would contribute to the random, worn look of the brick.

10 of those strips will make the 10x10 playing space. Those 10 strips get hot-glued onto a piece of cardboard that will later be painted and glued onto the cigar box lid.

Don't have a pre-painting photo, but for the walls, a 3/4" cube gets glued to a half-height piece to form the "dungeon stacker" shape.
Ball up a piece of aluminum foil and run it over every side of every block and dungeon floor sheet. It will help create a rough, rocky pattern in the foam.
Painting time
So, we're going to be painting every side of every block at once. So we need to make a drying rack first. Take all of those sewing pushpins and push them into a spare sheet of insulation. Goal is to have a pin-bed you can place the painted blocks on top of to dry.Painting is a two-step process: base layer and dry brushing.
For the base layer, I mix 1 part PVA glue with 1 part black acrylic paint. The PVA glue will dry hard and make the foam a little more solid. Give full coverage with the base layer all-over.

The next day, it's time for the dry brushing. Won't go into too much detail on dry-brushing here, but, basically, load a little bit of gray paint on the brush, wipe off almost all of it on a piece of paper, then "dust" the brush back and forth over the surface you're painting. The little bit off remaining paint (and there's always some remaining paint) will catch the highest surfaces on the object you're painting. So you'll end up with a surface that has crevices painted in black, and higher surfaces painted in lighter gray. Looks 3D and great.

After another bit of drying, we're done with painting. I wanted a dungeon floor that was a combination dungeon & garden, so I randomly paint some PVA glue onto the surface and sprinkle green flock on top.

Take the piece of cardboard the dungeon floor strips are attached to and trim it to the size of the inside of the cigar box lid. Use a bunch of PVA glue and attach it to the inside of the lid.

Since the bottom part of the box was going to be used for dice rolling, I wanted the walls to be a little taller. Do some math: inside height of lid + inside height of box bottom - height of dungeon floor strips - little bit of wiggle room = how high to make the walls. Cut four walls out of the 3/16" balsa wood, PVA glue them to the inside of the box and clamp them until they dry. (Or do what I did and cut a piece of foam to press the walls into the box.)

After it dries, you'll want to take some sandpaper to the edges to round them out so they: a) Look nice, and b) the box can close smoothly.

For the bottom dice tray, measure the inside dimensions of your box, cut the felt to that size, peel & stick it to the box. Easy.
Finishing
Time to finish that crappy pine box. I chose shellac because of its quick drying time. Not going to even pretend to write a good guide on how to finish wood. Basically, sand with medium grit, sand with fine grit, wipe dust, apply shellac, wait an hour. Repeat. Do this about 2 or 3 times until everything looks good. Give it a final sanding.
If you like, do what I did and remove the pins from the hinges. Replace them with the large safety pins and any additional decoration you'd like. The idea is, you can separate the top and bottom of the box whenever you like.

Another optional thing: if you want inside divider walls, take the 1/8" sheet of balsa wood, cut out three pieces of the appropriate height and length, cut out slots so they fit together, then place them in the box.


And you're done!
How'd it go?
Well, it looks exactly how I imagined it would:

Versus Erdrick's Cave, Level 1:
Yeah, totally happy with how this looks:

Aww yeah:

Roll them dice:

Even based my doors after Dragon Warrior 2:

But, wow, are all of the blocks really light. Shouldn't be surprising considering the light-weight foam they're made out of, but exhale near them and everything goes flying. If I was going to build another one, I'd choose a heavier material for the wall blocks. 3D printing? Heavier finishing compounds? Hide coins inside the blocks?
Also, it takes a little bit of time to set up a room, so I wouldn't use this for every single room in a session. Maybe use it once to emphasize certain scenes.
Well done! This would rock for camping or getting new players onboard for a quick crawl by just yanking it out of a backpack after a couple beers.
ReplyDelete